Clean White, Every Time: Breaking Down a Pro's 6-Light Background Setup
White background photography sounds simple until you actually try it. The background goes gray, or it blows out so hard it halos around your subject, or you get a weird gradient that no amount of post-processing fully fixes. I’ve been there. Early in my teaching days, I watched a friend’s Etsy shop fail in slow motion, and when I looked at her photos, I realized the products were fine. The photos were the only problem. A muddy white background was making everything look cheap and untrustworthy. Clean whites signal quality. Buyers trust them. And getting them right is a technical problem with a technical solution.
In this The Slanted Lens tutorial, photographer Jay P. Morgan walks through how he lit 40 portraits of dentists on white in a single 10-hour day across three rotating sets. Watch the full tutorial on YouTube The workflow is portrait-focused, but the core lighting logic applies directly to product photography. The ratio he uses between background and subject exposure is something I now treat as a baseline for almost every white-background product shoot I run. Here is the full breakdown.
Step 1: Plan Your Setup Before the Camera Comes Out
 Three labeled sets arranged on a studio floor
Morgan and his crew built all three sets the day before the shoot. For a 40-image job with one hour per set, there was no room to figure out lighting on the fly. This same discipline applies to product shoots. If you are photographing a full product catalog in one day, build your set the night before, dial in your settings, take a test shot, and leave everything exactly where it is. Walking in with a confirmed setup means your first shot of the day is usable. Walking in cold means your first 45 minutes disappear into troubleshooting.
Three labeled sets arranged on a studio floor
Morgan and his crew built all three sets the day before the shoot. For a 40-image job with one hour per set, there was no room to figure out lighting on the fly. This same discipline applies to product shoots. If you are photographing a full product catalog in one day, build your set the night before, dial in your settings, take a test shot, and leave everything exactly where it is. Walking in with a confirmed setup means your first shot of the day is usable. Walking in cold means your first 45 minutes disappear into troubleshooting.
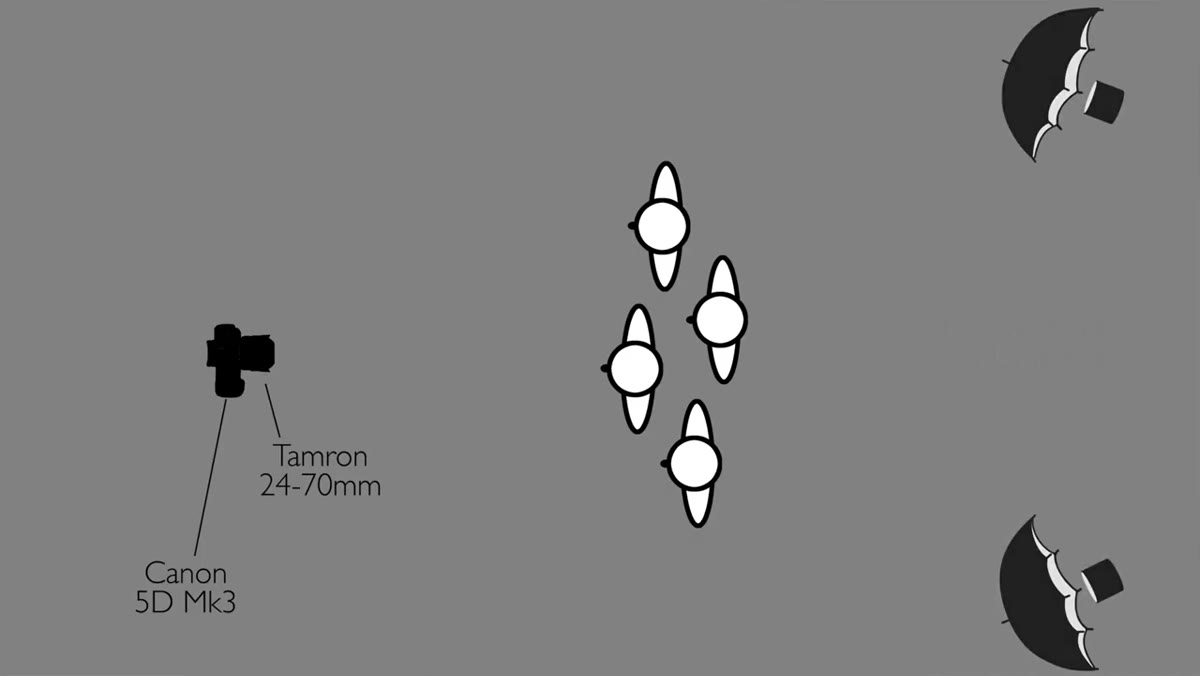
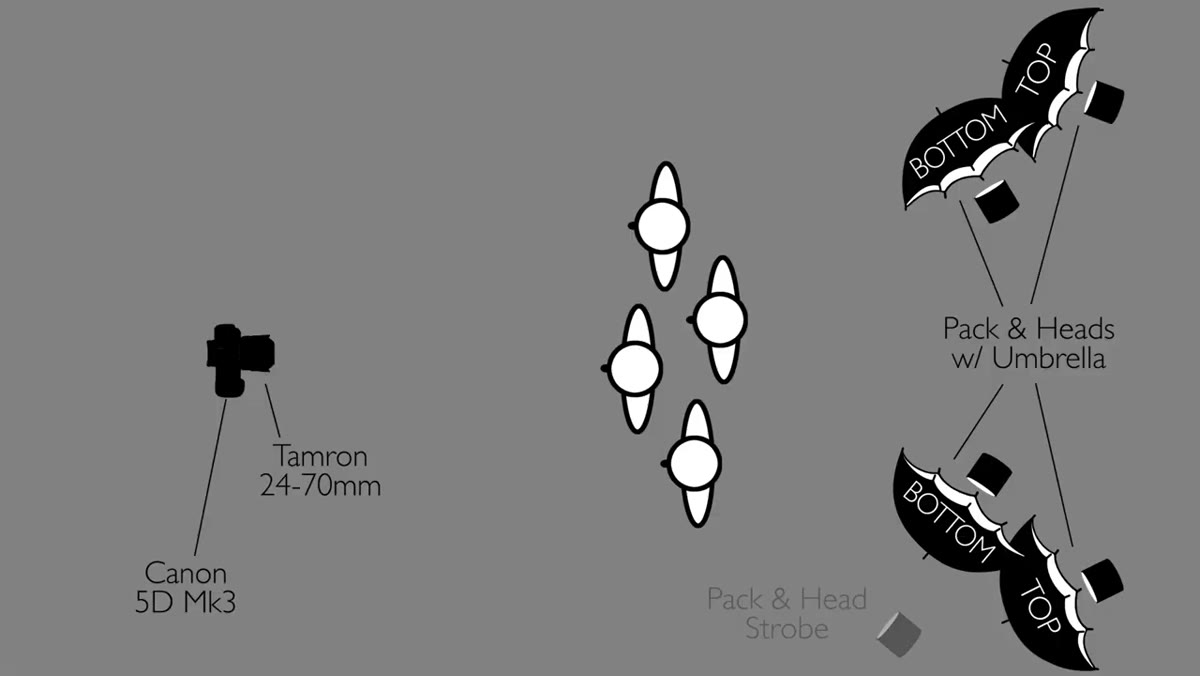
Step 2: Use Four Lights on the Background, Placed in Two Pairs
 Four studio heads positioned on each side of the white background
This is the part most people skip. Morgan uses four separate light heads just for the white background, two on each side. The reason you use four instead of two is coverage. A single light on each side leaves hot spots in the center and falloff at the edges. You want the background to read as evenly white across its full surface.
Four studio heads positioned on each side of the white background
This is the part most people skip. Morgan uses four separate light heads just for the white background, two on each side. The reason you use four instead of two is coverage. A single light on each side leaves hot spots in the center and falloff at the edges. You want the background to read as evenly white across its full surface.
Each pair is mounted vertically on the same side: one head up high on a stand, one lower using a clamp. Morgan points out that two full stands side by side would not fit in the available space. The clamp-and-stand combo solves a real physical problem, not just a conceptual one.
Step 3: Angle the Top and Bottom Heads Differently
 Top lights aimed straight at background, bottom lights angled down and inward
The two top heads point mostly straight at the background with a slight turn toward the center. You do not want them angled so far inward that they spill light onto your subject. They are background lights, not fill lights. Keep them focused on the wall.
Top lights aimed straight at background, bottom lights angled down and inward
The two top heads point mostly straight at the background with a slight turn toward the center. You do not want them angled so far inward that they spill light onto your subject. They are background lights, not fill lights. Keep them focused on the wall.
The two bottom heads get a different treatment. Angle them slightly inward AND slightly downward. This sends light across the floor, which fills in the transition zone between the floor and the background. Without this, you often get a visible line where the floor meets the cyclorama or seamless paper. With it, the whole lower portion of the frame glows evenly. It is a small angle adjustment that eliminates a problem you would otherwise spend real time fixing in post.
Step 4: Meter the Background to One Stop Brighter Than Your Subject
 Photographer using a light meter to read the background exposure
This is the ratio that changed how I think about white backgrounds. Morgan meters the background at f/16 and his subject at f/11. One stop brighter on the background than the subject. That difference is enough to render the background as clean, bright white in camera without blowing the light forward onto the subject.
Photographer using a light meter to read the background exposure
This is the ratio that changed how I think about white backgrounds. Morgan meters the background at f/16 and his subject at f/11. One stop brighter on the background than the subject. That difference is enough to render the background as clean, bright white in camera without blowing the light forward onto the subject.
Use an incident light meter for this. Hold the meter facing your camera from the subject position and read your key light. Then hold it facing the camera from the background and read the background lights. Adjust your light power until the background reads exactly one stop hotter. Do not guess. Do not look at the histogram and call it close enough. Meter it. The cleaner you get this in camera, the less time you spend on 40 product cutouts in Photoshop later.
Step 5: Add a Rim Light to Separate Subject from Background
 Rim light positioned camera-right behind the subject
With the background glowing at f/16, there is still a risk that a light-colored product or subject will start to visually merge into the white behind it. A rim light solves this. Morgan places his on camera right, behind the subject, which creates a defined edge. For product photography, this edge separation is critical when the product itself is white, silver, or pale. Without a rim, the outline disappears and the product looks like it is floating in nothing.
Rim light positioned camera-right behind the subject
With the background glowing at f/16, there is still a risk that a light-colored product or subject will start to visually merge into the white behind it. A rim light solves this. Morgan places his on camera right, behind the subject, which creates a defined edge. For product photography, this edge separation is critical when the product itself is white, silver, or pale. Without a rim, the outline disappears and the product looks like it is floating in nothing.
The rim light does not need to be powerful. It just needs to be brighter than the ambient spill from the background lights hitting the back of your subject.
Step 6: Use an Octodome as Your Key Light for a Clean, Slightly Harder Highlight
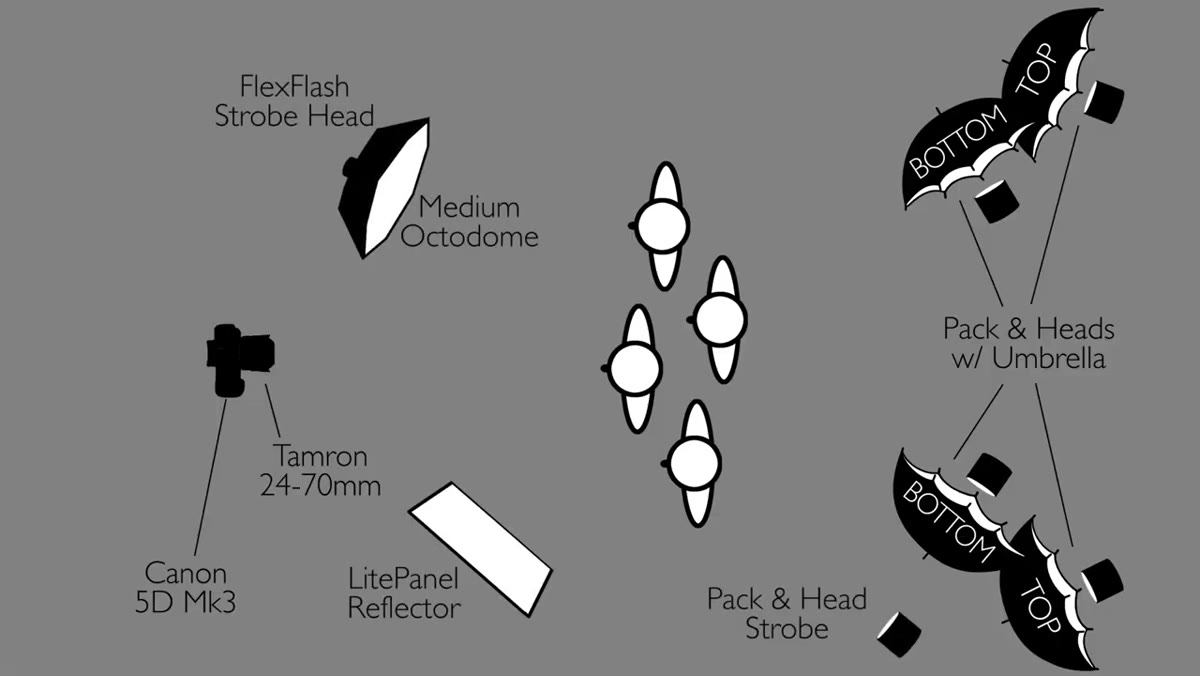 Medium octodome on a boom arm in front of and above the subject
Morgan chooses a medium octodome over a softbox for the key light. His reasoning is precise: octodomes are shallower than softboxes, which produces a slightly harder highlight. For portraits this reads as more sculpted and flattering. For products it translates to better material definition. A softbox can flatten out texture on matte packaging or make reflective surfaces look muddy. An octodome gives you enough softness to avoid harsh shadows while still rendering surface detail clearly.
Medium octodome on a boom arm in front of and above the subject
Morgan chooses a medium octodome over a softbox for the key light. His reasoning is precise: octodomes are shallower than softboxes, which produces a slightly harder highlight. For portraits this reads as more sculpted and flattering. For products it translates to better material definition. A softbox can flatten out texture on matte packaging or make reflective surfaces look muddy. An octodome gives you enough softness to avoid harsh shadows while still rendering surface detail clearly.
Set this as your key light at f/11 to maintain that one-stop ratio below the background. Check your shadows on the surface beneath the product. If the shadow is too harsh, move the octodome closer or raise it higher, but do not change your aperture to compensate. Change the light position.
What I Do Differently for Product Work
Morgan’s setup is built for speed on a portrait shoot with a large crew. When I am shooting product for a small business client on a tighter budget, I cannot always run six heads. What I can always do is honor the ratio. Two background lights and one key light is enough if you meter carefully. I have run this setup with two speedlights on the background and a single strobe up front and gotten clean white results because the one-stop difference was dialed in. The number of lights is less important than the exposure relationship between them.
The other thing I would add: test your white balance before you start. Background lights and key lights from different manufacturers can have slightly different color temperatures. If your background is slightly warm and your key is neutral, your white will look off even at the right exposure. Match your light sources or set a custom white balance from a gray card.
The single most important thing to take from this tutorial is the metering ratio: one stop brighter on the background than your subject. Everything else, how many lights, which modifiers, how they are arranged, is in service of hitting that number cleanly. Get the ratio right and you get a white background that does not require hours of masking and selection work afterward. That is time you can spend on more setups, more products, or frankly, eating dinner.
Watch the full tutorial on YouTube to see Jay P. Morgan walk through the full shoot, including how the setup adapts across different set designs.